What is a database table partitioning?
Partitioning is the database process where very large tables are divided into multiple smaller parts. By splitting a large table into smaller, individual tables, queries that access only a fraction of the data can run faster because there is less data to scan. The main of goal of partitioning is to aid in maintenance of large tables and to reduce the overall response time to read and load data for particular SQL operations.
Vertical Partitioning on SQL Server tables
Vertical table partitioning is mostly used to increase SQL Server performance especially in cases where a query retrieves all columns from a table that contains a number of very wide text or BLOB columns. In this case to reduce access times the BLOB columns can be split to its own table. Another example is to restrict access to sensitive data e.g. passwords, salary information etc. Vertical partitioning splits a table into two or more tables containing different columns:
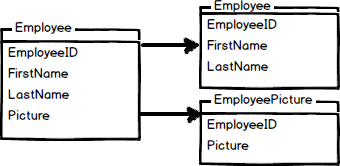
An example of vertical partitioning
An example for vertical partitioning can be a large table with reports for employees containing basic information, such as report name, id, number of report and a large column with report description. Assuming that ~95% of users are searching on the part of the report name, number, etc. and that only ~5% of requests are opening the reports description field and looking to the description. Let’s assume that all those searches will lead to the clustered index scans and since the index scan reads all rows in the table the cost of the query is proportional to the total number of rows in the table and our goal is to minimize the number of IO operations and reduce the cost of the search.
Let’s see the example on the EmployeeReports table:
|
1 2 3 4 5 6 7 8 9 10 11 12 13 14 15 16 17 18 19 20 21 22 23 24 25 26 27 28 29 30 31 |
CREATE TABLE EmployeeReports ( ReportID int IDENTITY (1,1) NOT NULL, ReportName varchar (100), ReportNumber varchar (20), ReportDescription varchar (max) CONSTRAINT EReport_PK PRIMARY KEY CLUSTERED (ReportID) ) DECLARE @i int SET @i = 1 BEGIN TRAN WHILE @i<100000 BEGIN INSERT INTO EmployeeReports ( ReportName, ReportNumber, ReportDescription ) VALUES ( 'ReportName', CONVERT (varchar (20), @i), REPLICATE ('Report', 1000) ) SET @i=@i+1 END COMMIT TRAN GO |
If we run a SQL query to pull ReportID, ReportName, ReportNumber data from the EmployeeReports table the result set that a scan count is 5 and represents a number of times that the table was accessed during the query, and that we had 113,288 logical reads that represent the total number of page accesses needed to process the query:
|
1 2 3 4 5 6 7 |
SET STATISTICS IO ON SET STATISTICS TIME ON SELECT er.ReportID, er.ReportName, er.ReportNumber FROM dbo.EmployeeReports er WHERE er.ReportNumber LIKE '%33%' SET STATISTICS IO OFF SET STATISTICS TIME OFF |
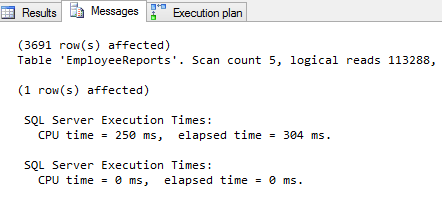
As indicated, every page is read from the data cache, whether or not it was necessary to bring that page from disk into the cache for any given read. To reduce the cost of the query we will change the SQL Server database schema and split the EmployeeReports table vertically.
Next we’ll create the ReportsDesc table and move the large ReportDescription column, and the ReportsData table and move all data from the EmployeeReports table except the ReportDescription column:
|
1 2 3 4 5 6 7 8 9 10 11 12 13 14 15 16 17 18 19 20 21 22 23 24 |
CREATE TABLE ReportsDesc ( ReportID int FOREIGN KEY REFERENCES EmployeeReports (ReportID), ReportDescription varchar(max) CONSTRAINT PK_ReportDesc PRIMARY KEY CLUSTERED (ReportID) ) CREATE TABLE ReportsData ( ReportID int NOT NULL, ReportName varchar (100), ReportNumber varchar (20), CONSTRAINT DReport_PK PRIMARY KEY CLUSTERED (ReportID) ) INSERT INTO dbo.ReportsData ( ReportID, ReportName, ReportNumber ) SELECT er.ReportID, er.ReportName, er.ReportNumber FROM dbo.EmployeeReports er |
The same search query will now give different results:
|
1 2 3 4 5 6 7 |
SET STATISTICS IO ON SET STATISTICS TIME ON SELECT er.ReportID, er.ReportName, er.ReportNumber FROM ReportsData er WHERE er.ReportNumber LIKE '%33%' SET STATISTICS IO OFF SET STATISTICS TIME OFF |
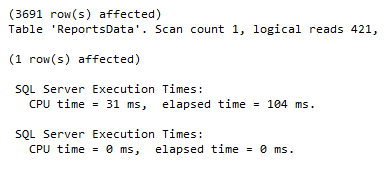
Vertical partitioning on SQL Server tables may not be the right method in every case. However, if you have, for example, a table with a lot of data that is not accessed equally, tables with data you want to restrict access to, or scans that return a lot of data, vertical partitioning can help.
Horizontal Partitioning on SQL Server tables
Horizontal partitioning divides a table into multiple tables that contain the same number of columns, but fewer rows. For example, if a table contains a large number of rows that represent monthly reports it could be partitioned horizontally into tables by years, with each table representing all monthly reports for a specific year. This way queries requiring data for a specific year will only reference the appropriate table. Tables should be partitioned in a way that queries reference as few tables as possible.
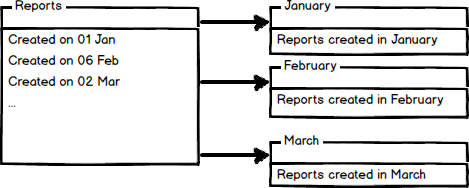
Tables are horizontally partitioned based on a column which will be used for partitioning and the ranges associated to each partition. Partitioning column is usually a datetime column but all data types that are valid for use as index columns can be used as a partitioning column, except a timestamp column. The ntext, text, image, xml, varchar(max), nvarchar(max), or varbinary(max), Microsoft .NET Framework common language runtime (CLR) user-defined type, and alias data type columns cannot be specified.
There are two different approaches we could use to accomplish table partitioning. The first is to create a new partitioned table and then simply copy the data from your existing table into the new table and do a table rename. The second approach is to partition an existing table by rebuilding or creating a clustered index on the table.
An example of horizontal partitioning with creating a new partitioned table
SQL Server 2005 introduced a built-in partitioning feature to horizontally partition a table with up to 1000 partitions in SQL Server 2008, and 15000 partitions in SQL Server 2012, and the data placement is handled automatically by SQL Server. This feature is available only in the Enterprise Edition of SQL Server.
To create a partitioned table for storing monthly reports we will first create additional filegroups. A filegroup is a logical storage unit. Every database has a primary filegroup that contains the primary data file (.mdf). An additional, user-defined, filegrups can be created to contain secondary files (.ndf). We will create 12 filegroups for every month:
|
1 2 3 4 5 6 7 8 9 10 11 12 13 14 15 16 17 18 19 20 21 22 23 24 25 26 27 28 29 30 31 32 33 34 35 36 |
ALTER DATABASE PartitioningDB ADD FILEGROUP January GO ALTER DATABASE PartitioningDB ADD FILEGROUP February GO ALTER DATABASE PartitioningDB ADD FILEGROUP March GO ALTER DATABASE PartitioningDB ADD FILEGROUP April GO ALTER DATABASE PartitioningDB ADD FILEGROUP May GO ALTER DATABASE PartitioningDB ADD FILEGROUP June GO ALTER DATABASE PartitioningDB ADD FILEGROUP July GO ALTER DATABASE PartitioningDB ADD FILEGROUP Avgust GO ALTER DATABASE PartitioningDB ADD FILEGROUP September GO ALTER DATABASE PartitioningDB ADD FILEGROUP October GO ALTER DATABASE PartitioningDB ADD FILEGROUP November GO ALTER DATABASE PartitioningDB ADD FILEGROUP December GO |
To check created and available file groups in the current database run the following query:
|
1 2 3 |
SELECT name AS AvailableFilegroups FROM sys.filegroups WHERE type = 'FG' |
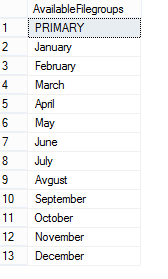
When filegrups are created we will add .ndf file to every filegroup:
|
1 2 3 4 5 6 7 8 9 10 |
ALTER DATABASE [PartitioningDB] ADD FILE ( NAME = [PartJan], FILENAME = 'C:\Program Files\Microsoft SQL Server\MSSQL11.LENOVO\MSSQL\DATA\PartitioningDB.ndf', SIZE = 3072 KB, MAXSIZE = UNLIMITED, FILEGROWTH = 1024 KB ) TO FILEGROUP [January] |
The same way files to all created filegroups with specifying the logical name of the file and the operating system (physical) file name for each filegroup e.g.:
|
1 2 3 4 5 6 7 8 9 |
ALTER DATABASE [PartitioningDB] ADD FILE ( NAME = [PartFeb], FILENAME = 'C:\Program Files\Microsoft SQL Server\MSSQL11.LENOVO\MSSQL\DATA\PartitioningDB2.ndf', SIZE = 3072 KB, MAXSIZE = UNLIMITED, FILEGROWTH = 1024 KB ) TO FILEGROUP [February] |
To check files created added to the filegroups run the following query:
|
1 2 3 4 5 6 |
SELECT name as [FileName], physical_name as [FilePath] FROM sys.database_files where type_desc = 'ROWS' GO |
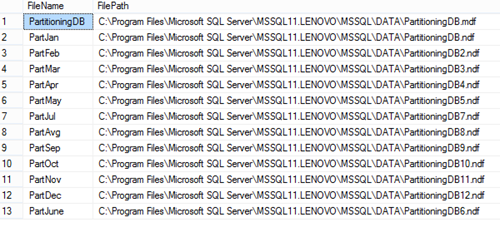
After creating additional filegroups for storing data we’ll create a partition function. A partition function is a function that maps the rows of a partitioned table into partitions based on the values of a partitioning column. In this example we will create a partitioning function that partitions a table into 12 partitions, one for each month of a year’s worth of values in a datetime column:
|
1 2 3 4 |
CREATE PARTITION FUNCTION [PartitioningByMonth] (datetime) AS RANGE RIGHT FOR VALUES ('20140201', '20140301', '20140401', '20140501', '20140601', '20140701', '20140801', '20140901', '20141001', '20141101', '20141201'); |
To map the partitions of a partitioned table to filegroups and determine the number and domain of the partitions of a partitioned table we will create a partition scheme:
|
1 2 3 4 5 6 |
CREATE PARTITION SCHEME PartitionBymonth AS PARTITION PartitioningBymonth TO (January, February, March, April, May, June, July, Avgust, September, October, November, December); |
Now we’re going to create the table using the PartitionBymonth partition scheme, and fill it with the test data:
|
1 2 3 4 5 6 7 8 9 10 11 12 13 14 15 16 17 18 19 |
CREATE TABLE Reports (ReportDate datetime PRIMARY KEY, MonthlyReport varchar(max)) ON PartitionBymonth (ReportDate); GO INSERT INTO Reports (ReportDate,MonthlyReport) SELECT '20140105', 'ReportJanuary' UNION ALL SELECT '20140205', 'ReportFebryary' UNION ALL SELECT '20140308', 'ReportMarch' UNION ALL SELECT '20140409', 'ReportApril' UNION ALL SELECT '20140509', 'ReportMay' UNION ALL SELECT '20140609', 'ReportJune' UNION ALL SELECT '20140709', 'ReportJuly' UNION ALL SELECT '20140809', 'ReportAugust' UNION ALL SELECT '20140909', 'ReportSeptember' UNION ALL SELECT '20141009', 'ReportOctober' UNION ALL SELECT '20141109', 'ReportNovember' UNION ALL SELECT '20141209', 'ReportDecember' |
We will now verify the rows in the different partitions:
|
1 2 3 4 5 6 7 8 |
SELECT p.partition_number AS PartitionNumber, f.name AS PartitionFilegroup, p.rows AS NumberOfRows FROM sys.partitions p JOIN sys.destination_data_spaces dds ON p.partition_number = dds.destination_id JOIN sys.filegroups f ON dds.data_space_id = f.data_space_id WHERE OBJECT_NAME(OBJECT_ID) = 'Reports' |
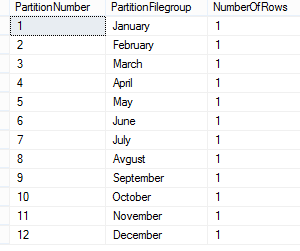
Now just copy data from your table and rename a partitioned table.
Partitioning a table using the SQL Server Management Studio Partitioning wizard
SQL Server 2008 introduced a table partitioning wizard in SQL Server Management Studio.
Right click on a table in the Object Explorer pane and in the Storage context menu choose the Create Partition command:
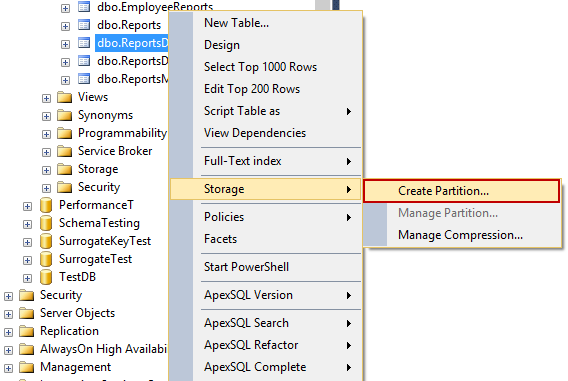
In the Select a Partitioning Column window, select a column which will be used to partition a table from available partitioning columns:
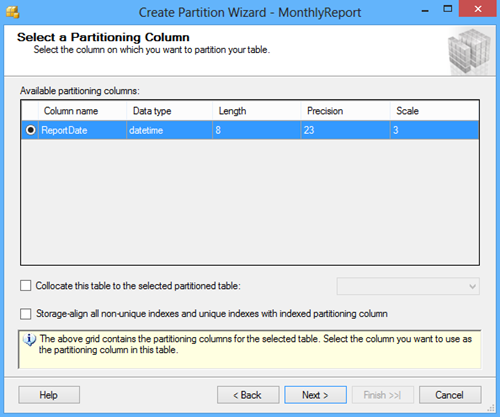
Other options in the Create Partition Wizard dialog include the Collocate this table to the selected partition table option used to display related data to join with the partitioned column and the Storage Align Non Unique Indexes and Unique Indexes with an Indexed Partition Column option that aligns all indexes of the partitioned table with the same partition scheme.
After selecting a column for partitioning click the Next button. In the Select a Partition Function window enter the name of a partition function to map the rows of the table or index into partitions based on the values of the ReportDate column, or choose the existing partition function:
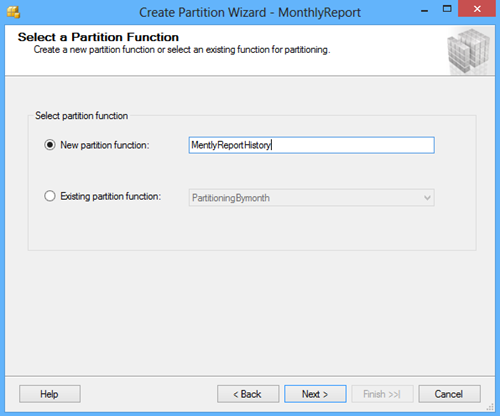
Click the Next button and in the Select a Partition Scheme window create the partition scheme to map the partitions of the MonthlyReport table to different filegroups:
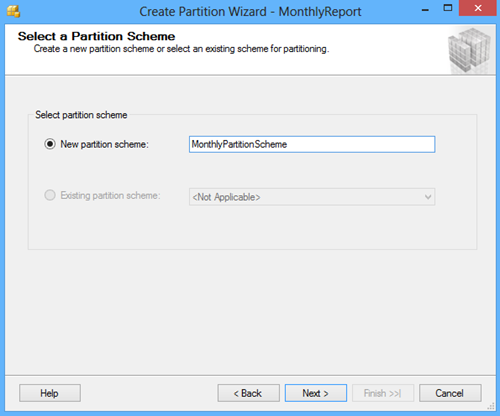
Click the Next button and in the Map Partitions window choose the rage of partitioning and select the available filegroups and the range boundary. The Left boundary is based on Value <= Boundary and the Right boundary is based on Value < Boundary.
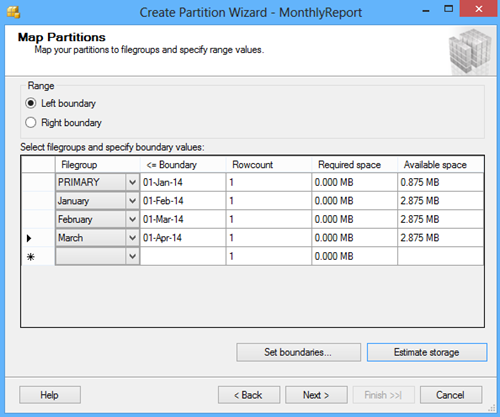
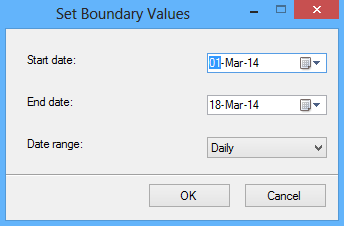
By clicking the Set boundaries button you can customize the date range and set the start and the end date for each partition:
The Estimate storage option determines the Rowcount, the Required space, and the Available space columns that displays an estimate on required space and available space based on number of records in the table.
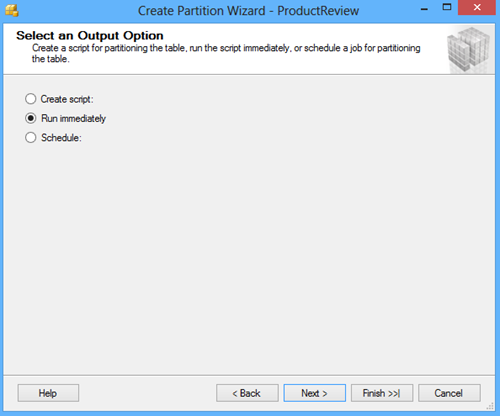
The next screen of the wizard offers to choose the option to whether to execute the script immediately by the wizard to create objects and a partition table, or to create a script and save it. A schedule for executing the script to perform the operations automatically can also be specified:
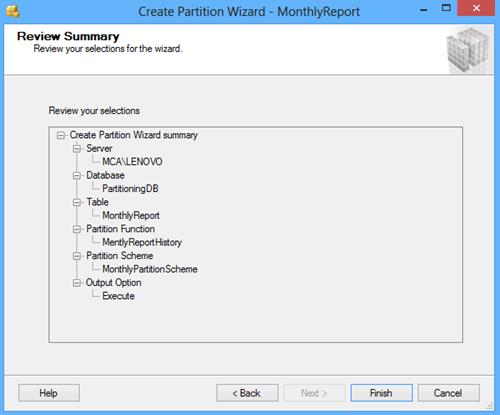
The next screen of the wizard shows a review of selections made in the wizard:
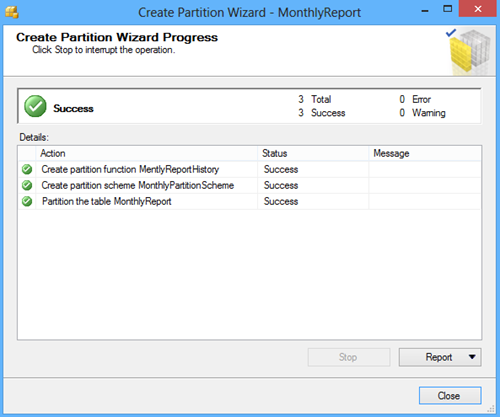
Click the Finish button to complete the process:
References
- Creating and using CRUD stored procedures - April 7, 2014
- Database table partitioning in SQL Server - April 4, 2014
- SQL Database design: Choosing a primary key - March 16, 2014
